Tapping tips by Mr. Jean-Marie Chabot
I had the chance to interview a person with extensive experience in the maple syrup industry, Mr. Jean-Marie Chabot, co-founder of CDL Maple Sugaring Equipment. This seasoned entrepreneur shared his tapping tips with us so that both newbies and the more experienced of you, dear customers, can brush up on your skills as the new season dawns. We hope you will benefit from this interview, happy reading!
Anne-Sophie Couture-Goulet (ASCG): What are the basic principles to know before even making your first cut?
Jean-Marie Chabot (JMC): The basic principle is that you have to find a place on the tree to be able to drill, to observe carefully, go around the tree, to find the best spot.
ASCG: It means we have to go around each tree to find the best location.
JMC: I would say you have to have it in your head, because there is no better way, you have to find old holes that are often several years old, sometimes more than 25 years old. You have to go back that far, because there are places in Quebec where the growth and healing of the tree is slower. You have to be able to find the scar. You have to be able to tell the scars apart from the other roughness in the bark of the tree. It is very difficult to find the right place 100% of the time, because even the most experienced have difficulty in doing so. This is fundamental, because if you drill in compartmentalized wood, there will be no sap. If you land on a tree that has two taps, one in dark wood (compartmentalized) and the other in white wood, there is a tap that will give nothing at all. It’s very, very important.
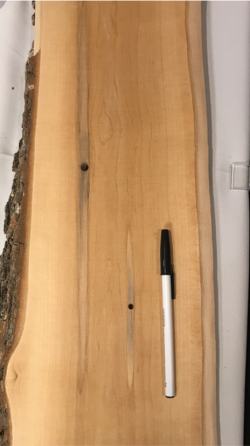
To get the people who took my tapping courses to understand this principle, I had planks sawed from the trunk of maple trees to show examples. We can see the different layers of hole in the tree (see the next picture), which go from a depth of 0 to 6 inches to see the compartmentalization.
The compartment is about twice the width of the bit that drilled the hole, and the length is about 12 inches long, 6 inches at the top and 6 inches at the bottom of the tap, for small spouts, and up to 24 inches long for the older 7/16 ” (12 inch top, 12 inch bottom notch) spouts used 20-25 years ago, which were larger than today’s spouts. It is for this reason that it is imperative to find old scars on the tree.
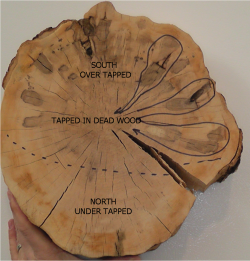
ASCG: I see the photos of your boards (see images). I even see cuts where the maples have been over-tapped in the South, and under-tapped in the North.
JMC: In the old days, when people were using buckets, they thought they got more sap tapping on the south side, where the tree was more exposed to the sun than on the north side, where there is less light. Now, with vacuum tapping, it is no longer true. You can now drill 360 degrees for the new taps.
ASCG: Can you explain what is a tapping pattern?
A tapping pattern is good for new trees or for year 1 of a sugarbush that has never been tapped. It’s a lot harder to use this principle on trees that have been tapped before.
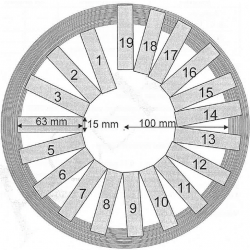
A tapping pattern starts with a hole on year 1. When you come back on year 2, you create a spiral pattern (see image). It’s just like a clock, you tap at noon the first year, then at 11, then 10 and so on, creating a spiral on the tree. After about 20 years later, you are back to the same location as the first year. Can’t really do this on old trees or an old sugarbush.
ASCG: I think that with the pandemic, there are a lot of people who have found in maple syrup production a great pastime to do with their family at home. For a first season, what are the essential tools to have?
First, it takes a battery-powered drill, with a battery that has at least 4 Amps / hour. Today, there are even 6 amps/ hour batteries that allow you to do a full day without any battery recharging. I would tell you that a 5 Amps / hour is likely to make the day, but a 4 Amps / hour will die after 300 taps! (Laughs)
ASCG: Happened to me to, we did carry another battery!
After that, you need a good tapping bit. This is fundamental. It takes a bit that cuts like a razor. It has to be sharpened like new, and it is not possible to sharpen by hand, it takes specialized tools to do it. A bit that has drilled about 1500 holes is worn out; it needs to be resharpened, but most tapping professionals take a new bit.
You also need a tapping hammer, the type depends on the spout you choose. If you chose a 1/4″ spout, you need to take a 6 oz hammer. If you have a 5/16 ” spout, you need a hammer that is about 8 ounces, plus or minus an ounce. It takes a hammer preferably made of metal. Because if you take a wooden hammer, which will be lighter, that can do, but you will have to hammer in a different way.
ASCG: If I understand correctly, everything is actually interrelated. Depending on the choice of spout, we will make the selection of the drill bit and also of the hammer. In conclusion, we must choose the right spout and then purchase the tools accordingly.
JMC: Yes, that’s it. To get proper advice on this, people can ask their maple specialist.
Another tool I would like to talk about is a tool sold by CDL, the Precision Tapper. It is an essential tool recommended for professionals who tap several thousand maple trees per year, or for beginners who are not consistent enough. This is why the Precision Tapper exists, to always have identical holes, because it is the machine that directs the bit into the hole, not the hands!
For example, if you are unstable on your snow shoes or if your hands are not still, you risk making a slightly oval hole. It can’t be seen with the naked eye, but if you make taps that aren’t perfectly circular, you can create microleaks, which will be difficult to fix. If you have microleaks in every other tree, maximum vacuum level will be difficult to achieve, and therefore the syrup production will be lower in the end.
ASCG: Stability during drilling and the dexterity of people is important?
JMC: It is essential to be a good tappers. I have seen people with over 25 years of experience being outmatched by younger tappers for these reasons. You have been warned!
Another tip is to sterilize your bit before each tap, so you don’t carry fungi and diseases from one tree to another. It has a direct impact on your production. It takes a bottle of alcohol with a spray bottle to properly sterilize the tapping bit. You never spray into the hole; it used to be done, but now it’s forbidden.
ASCG: What is the ideal procedure to maximize tapping and the long-term profitability of your sugar bush?
JMC: Another way to maximize tapping that I haven’t explained before is when you untap after sugar season. You can make a mark with paint around the hole you just made. When you go back the next season, you will easily identify the tap from the last season. This is a new practice that many are doing now. In the long run, you will be able to follow the spiral movement (tapping pattern), or else, quickly identify the evolution of your piercing from year to year over time.
ASCG: So it’s a good idea to mark tap hole with paint to track tapping years, and change color each year.
JMC: Others use a small thumbtack with a colored head to mark the hole, following the same principle as with painting. This is another way of doing it.
There is a third way to do it. Producers also use spouts of different color. They divide their sugarbush into sections, and each section uses a specific spout color. If an employee taps well or badly, you will know. This allows you to monitor the tapper’s dexterity and the quality of his work, and if there are any adjustments or training needed.
A good tapper does between 300 and 350 taps per day. Those who go faster than that, it’s because they didn’t do “a good job”! (Laughs) They didn’t take the time to identify the correct tapping location on the tree. Those who want to set records and those who say: “Me, I want to do 500”, I tell them: “Hey, the only place where you can go fast is between two maple trees! Never in front the tree! (Laughs)
ASCG: (Laughs): I understand!
JMC: You can run to do more maples, but when you get there, you have to take your time to observe and choose the position of the tap.
ASCG: What is the maximum number of taps per maple that you recommend in relation to the circumference of the tree?
JMC: There are standards on this and tests that have been carried out by various research centers. You can have one or two taps per maple, very, very rarely three per maple. In my case, I use a small rope or a measuring tape to measure the circumference. We are talking about 25 ½ inches in circumference for one tap, and then 51 inches for two taps.
ASCG: So this is to be remembered, do not overload the maple with too many taps.
JMC: In my case, it never exceeds two taps per maple. There are places like in southern Quebec, where there are very large maples, producers can tap up to three holes per maple. The fewer holes you tap, the healthier your maple is, and the less likely you are to make tapping mistakes in the future.
ASCG: On the positioning of the taps in the following years?
JMC: That’s it, that’s it.
ASCG: What is the ideal tap depth? The angle of the bit, and ultimately, the spout type?
JMC: For the depth, it’s about 2 inches, including the bark. The bark can be up to 1 ½ inch on very large trees. If you carry on yourself, a screwdriver for example, to be able to remove the dead bark on the surface. We are looking at a depth of 2.5 inches in this case because the bark is much thicker.
The recipe that is recommended is 1 ¾ inch in white wood. Let’s say 2 inches total with the bark, because the bark that is not dead is about ¼ inch thick.
ASCG: To help people, do you have a tip help them get to the right depth?
JMC: Yes, you can introduce into the end of the tapping bit a small piece of 5/16” tubing at the bottom, which will stop the entry of the bit at the right depth. You’ll never go too far, because the 5/16’’ will stop you and press on the bark because the spirals of your bit are going to be filled. It does very well.
ASCG: For the angle of the bit and the torch, what do you recommend?
JMC: For the angle, a very low slope, because of the vacuum today, the slope is hardly necessary. If you make a slope, whatever the slope, when you make the initial attack, the end of your wick will slide on the bark and you are more likely to make a notch on the edge of your hole which will create a microleak. You drill almost 90 degrees to the surface of the tree.
ASCG: Then what about the hammering?
JMC: The hammering … A spout is not a nail, eh! (Laughs) You have to get that in your head, some people say: “I worked in construction, I know how to hit with a hammer! » I tell them:« No, you don’t know how, you will probably hit too hard! With today’s spouts, especially a ¼ ”or 5/16’’ spout, made from plastic, it’s flexible. You don’t have to hit hard. The only possible indication is the sound the hammer will make when you hit your spout.
Depending on the plastic type of the spout, polycarbonate or nylon are the most common, the sound will not be the same from one to the other. Even the size of the spout will affect the sound. It’s really by ear that you decide how many times you’re going to hit your spout. It shouldn’t be very hard, because if it’s too hard, you will probably create micro-leaks which last all the season. spouts today are slightly tapered, and you don’t have to hit them hard to get them to fit into the hole.
A few flicks of the wrist – it’s not the shoulder that hits, it’s the wrist! Construction guys often hit with their shoulder! You have to hit with the wrist, and it’s not easy for everyone. This is why you should choose a low weight hammer specialized for maple syrup production.
ASCG: The choice of hammer remains among the essential elements to consider for the long-term profitability of the sugarbush.
JMC: This is fundamental, because if you tap your maple in the middle of January, and your maple is frozen hard, it will split less; whereas if you tap at the start of the sugaring season, the maple has started to flow and the wood is soft. A good tapper will be able to tap in frozen January wood as well as in thawed wood, closer to sugaring season. It’s all about hearing the sound or feeling when you tap your spout.
ASCG: Someone with a big maple bush, a lot of taps, really has to adapt to the temperature to do a good job
JMC: Exactly, you understood correctly! You would be a good tapper! (Laughs) New tappers are often better than more experienced ones with bad habbits! A crooked tree is hard to straighten, if you can understand my comparison! (Laughs)
The most common mistakes to correct are deciding where to place the new hole and how to hit on the spout.
ASCG: For maple syrup producers with buckets, is the advice the same, or do you have any other advice to give them for tapping properly?
JMC: Yes, the same rules apply. However, choose a spout that can hold the weight of a bucket full of sap.
ASCG: How to set up with 3/16 ’’ tubing by gravity? What are the principles to remember to be successfull?
JMC: For gravity, it’s good when you have fairly steep slopes in the maple bush. To get enough flow, your gravity tube has to go up the slope, you can’t have a pipe installed across the slope. It takes a slope to create a natural or artificial vacuum in the tubing. With gravity, you’re going to have greater suction effect when it’s up the slope. The closer you go down to your collector at the bottom, your vacuum level is practically zero. When your 3/16 “hose is going to go 90 degrees to the slope, your maximum performance is going to be at the last tap in your tubing. It is the one that will get the highest vacuum due to the weight of the water column in your pipe.
You will never achieve production as high as a high vacuum pumping system. You always have zero on your collector, if you have very big slopes like in mountains, you will maybe reach 26 in of Mercury at your last tap, but you must always divide by two to get your average.
Installing 3/16 ’’ by gravity is a good transition step for producers that want to gradually switch from a bucket installation to a vacuum tubing installation.
ASCG: How to properly untap and wash the tubing? What tools should I get?
JMC: Do it as soon as possible after the sugaring season, because the tree has not yet had time to heal, and removing the spout does not cause additional injury. Your untapping must be done with tools suitable for your spout. Your spout is going to be easier to remove with a smaller diameter than a large diameter. It takes a spout puller that matches your spout.
To untap, many use isopropyl alcohol to sterilize their tubing. We use a small container of alcohol behind your back with a measuring device, you suck in about 15 ml of alcohol for each tap to sterilize for the off-season. Very important: you must always start untap starting at the last tree in the line, the one furthest from the collector, working your way down to your collector, so that your alcohol is everywhere in the system. When you untap this way, any old sap that might be left in the tubing will be vacuum sucked. The alcohol vapors will work in the summer to kill all bacterias.
Once the work is complete, it is recommended to send in each end of the main line 1 liter of alcohol per 1000 feet of length. This is another good practice, but it is an economic decision.
ASCG: Thank you very much for your time, Mr. Chabot, and for this wonderful interview.
JMC: It made me happy! Pay it forward, is an important principle to me. Maple sugaring is the passion of my life, I’ve been doing for 50 years. Also, I have always looked for new technologies and new ways of doing things. It is fundamental for me, to keep the maple industry alive at the international level.

